 Facebook
 Twitter
 Pinterest
 Copy Link
Preparing Your Garage for an Electric Car
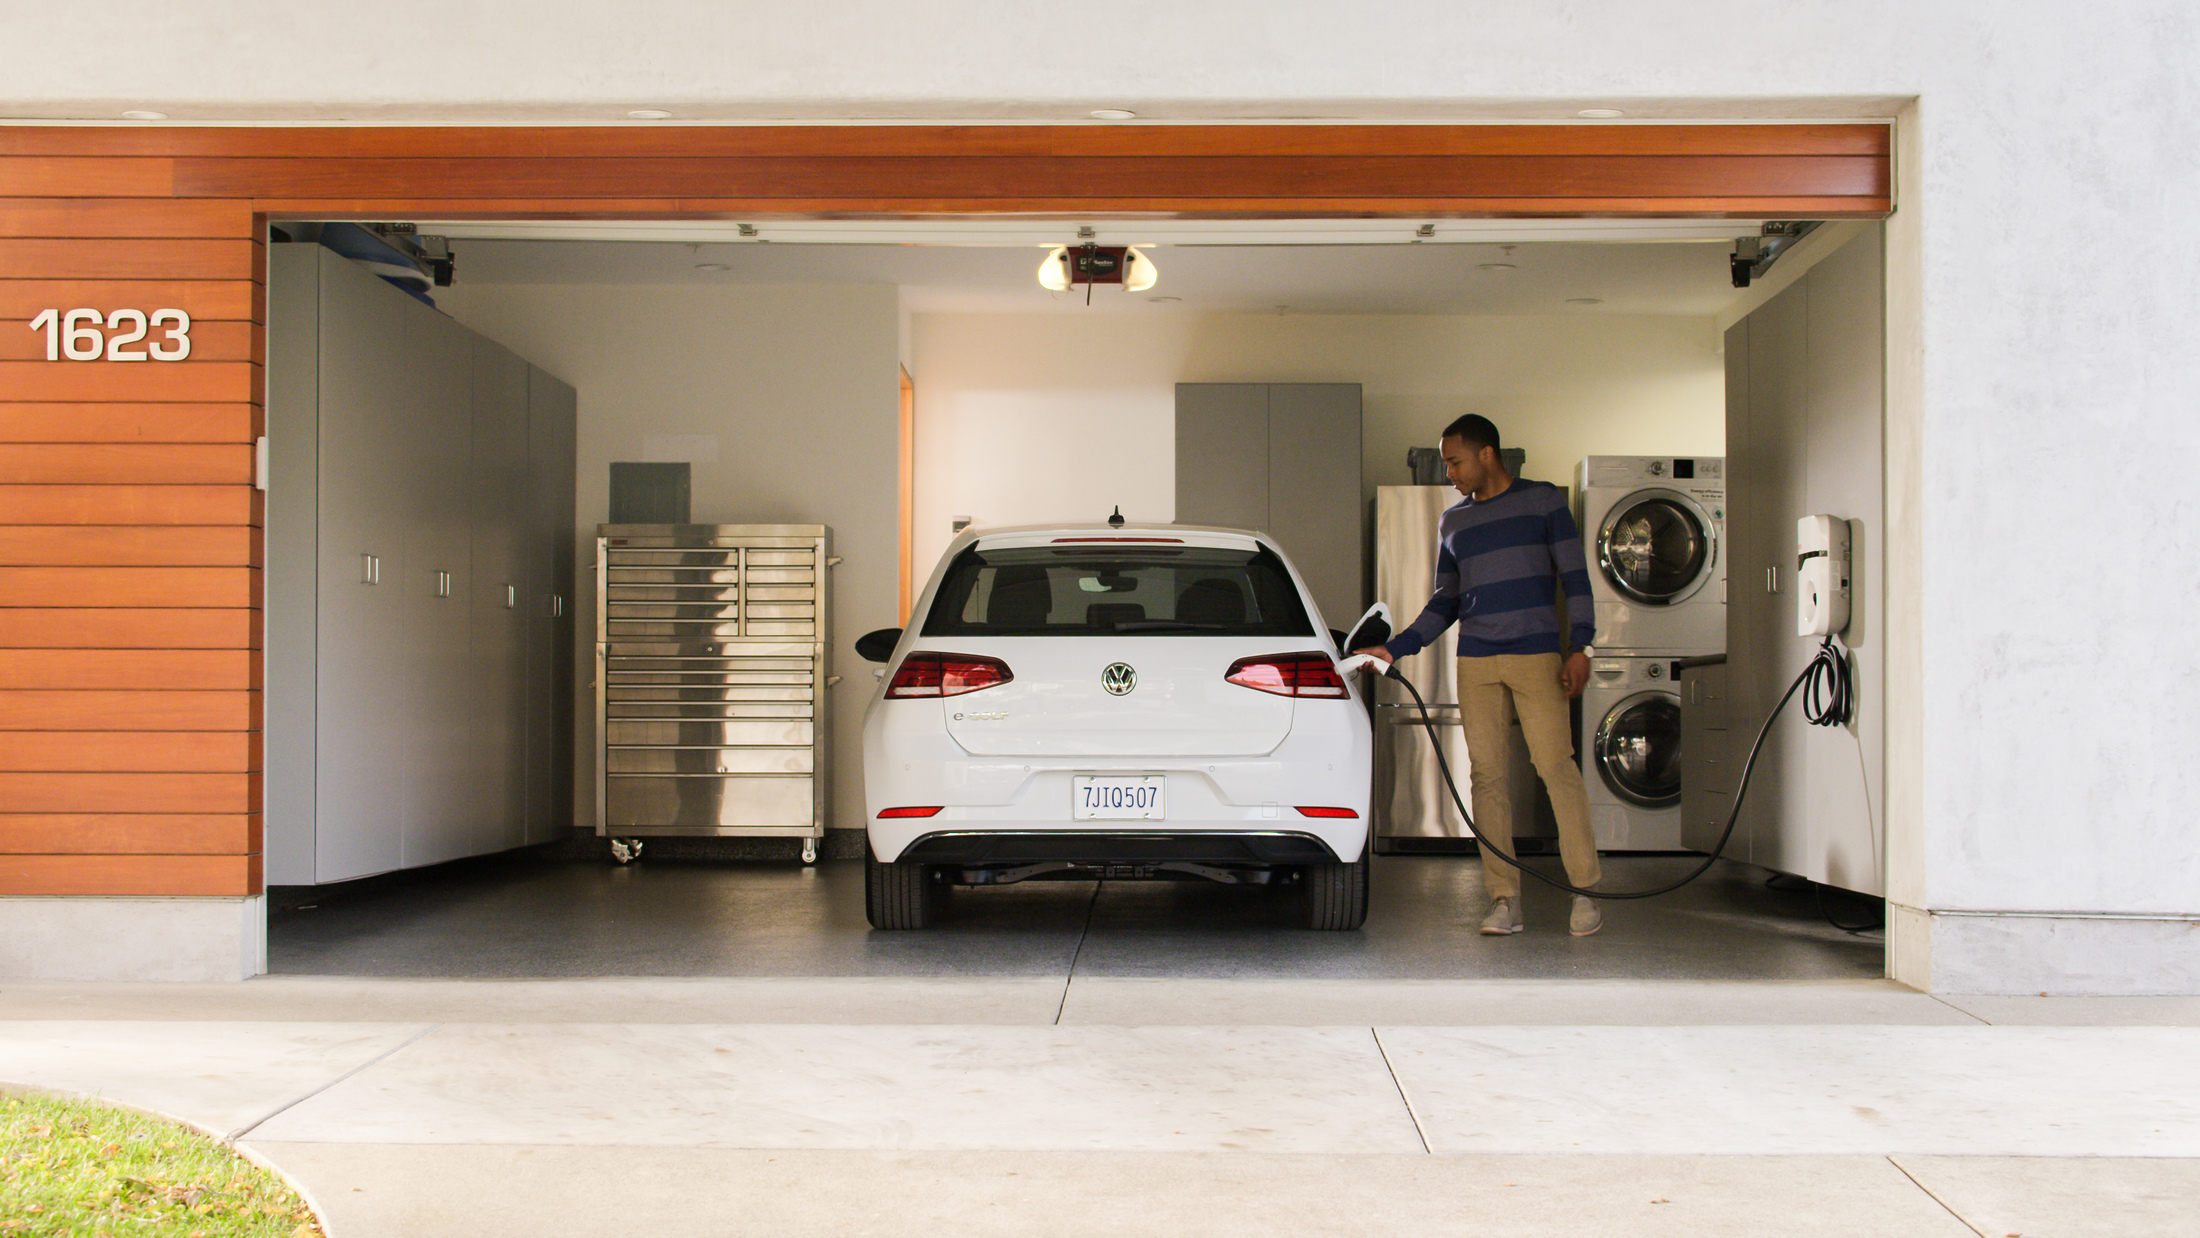

Photo Source: FleetCarma.com
Electric cars help lower emissions and fuel costs, improve fuel economy, and bolster energy security. And considering the volatility of gas prices—and their general skyward trajectory—electric fuel shows promise as an economic alternative. But switching to an electric vehicle entails more than new driving habits and a conversation piece with strangers. It’s also a lifestyle update. From setting up a charging station in the garage to maintaining optimal temperatures therein, check out these useful garage preparation tips to assure your electric vehicle battery is in tip-top shape.
Selecting a Charger: Level 1 vs. Level 2
Charging an electric vehicle is more involved than charging your smartphone, and you’ll likely need a home station charger. That said, make sure you familiarize yourself with the two main levels of electric vehicle chargers supplied by home-based charging equipment and most public charging stations so you can choose the best one for your home and car.
Level 1 Chargers
A Level 1 cord set charger delivers a standard household current of 110 or 120 volts and comes with most plug-in vehicles upon purchase. It’s outfitted with a three-pronged, household plug at one end that’s connected to a control box by a short cord. A longer 15-to-20-foot cord running from the other side of the box connects directly to the vehicle itself.
- If you have the time, a Level 1 could be the way to go. But be forewarned: What you get is, more or less, a trickle charge that affords roughly three to five miles per charging hour. For instance, the Nissan Leaf takes around 24 hours to fully charge on a standard 120-volt household outlet.
- The upside is, Level 1 equipment doesn’t entail an elaborate setup of high-power circuit breakers or dedicated electrical lines, which are required by major appliances like stoves and refrigerators.
- Because cord sets are portable, plug-in vehicles can be charged virtually anywhere there’s a standard outlet. Provided the circuit isn’t a household outlet that’s patched into the same circuit as other demanding appliances—in which case you could trip a circuit breaker.
Level 2 Chargers
You can also consider installing a Level 2 charger, which delivers 240 volts and replenishes pure electric vehicles in about three hours—which is about seven to eight times faster than Level 1 equipment. Unlike the simplicity of Level 1 setups, though, Level 2 chargers may warrant the services of a professional due to the rigmarole of electrical codes, equipment setup, and necessary inspections.
- Level 2 chargers cost anywhere between under $300 to over $1500, the price ultimately depending on cord length and amperage.
- Level 2 outputs typically range between 16 to 30 amps, but professionals often recommend around 30- to 40-amp systems—an adequate overnight charge for most plug-in electric cars.
Installing a Charging Station
It’s worth mentioning that the “charger” you’re installing is technically referred to as Electric Vehicle Service Equipment (EVSE). This is the wall-mounted box with cord and plug that delivers electricity and functions as a communication and safety unit for the actual charger situated inside the vehicle itself. The EVSE ensures the battery doesn’t overheat and shuts the charging session down if there’s a short circuit, power surge, or any other type of faulty hardware.
If you’ve opted for a Level 2 ESVE, you’ll likely need to reach out to a professional electrician to wire up equipment and determine where the ESVE should be situated in regards to where your vehicle is parked. Notwithstanding factors like outdated wiring, meters, and breaker panels, updating the garage for your electric ride should actually be pretty straightforward.
Cost of Installation
The installation cost generally hinges on the work involved—such as the amount of wire that needs to be run, whether additional or replacement breaker panels are necessary, and the cost of labor in your area. This could vary between just a few hundred dollars to a couple thousand. It’s also worth looking into your local. utility company’s offerings, as you may qualify for special rates or a rebate when you install an ESVE.
3 Quick Maintenance Tips To Make Your Roof Last
Your roof is one of the most important assets of your home. Here are some tips to help maintain it.
This article originally appeared on Porch.com
A brand-new roof is a massive investment, but no other element of your home is quite as valuable. While the average lifespan of a roof is about 15 years, careful homeowners have a few ways to extend the life of their homes without enduring too many headaches. Take a look at these three quick maintenance tips that will make your roof last.
1. Keep Your Gutters Clear
Most people don’t think of their gutters as part of their roof, but allowing debris to accumulate and clog your gutters adds extra weight and pulls away at your roof’s fascia, which can be a costly fix. Look down the length of your roof for any signs of sagging or bending – that’s a sure sign your gutters are carrying too much weight and pulling at your roof. Downspouts should also be carefully maintained, but don’t be fooled by easy-flowing water. Moss and algae buildup on and around your roof can slowly eat away at your roofing material and severely compromise its integrity.
2. Focus On The Attic
The exterior of your roof isn’t the only area you should be focused on. Your attic is your roof’s first line of defense against damage and you have two methods of attack: insulation and ventilation.
Insulating your attic has the double benefit of keeping your home’s internal temperature at a more reasonable level while also preventing vapor and moisture buildup on the underside of your roof. When combined with proper ventilation (which may mean adding a fan to your attic), your attic can stay dry and keep your roof’s rafters safe from moisture damage.
3. Catch Problems Early
Check on your roof regularly, whether it’s with every change of the season or after a significant storm. Catching small issues early on can only save you money in the long run, so utilizing the services of a reliable, professional roofer is an invaluable asset. As with any working professional, it’s a good idea to establish a working relationship with a roofer and even consider scheduling a yearly checkup for your roof just to make sure there aren’t any problems sneaking up on you. After all, spending a little each year to maintain your roof is a lot better than dropping $15,000-$50,000 on a new one, right?
Homeownership Has Declined, But It Won’t Be Forever
Below is an article from Windermere's Chief Economist Matthew Gardner. He shares his views of the declining homeownership, and why he believes it won't be a lasting trend.
In addition to talking about housing bubbles, another topic that is becoming popular among housing scaremongers is the ongoing decline in the U.S. homeownership rate. Remarks range from the direct, “American homeownership is at its lowest level in more than two decades,” to the downright inflammatory, “Rental surge to drop homeownership rate to 61.3% by 2030”. When I read statements like this it always drives me to dig into the data to see what is really going on.
The data that everyone uses to track homeownership is provided by the U.S. Census Bureau, which publishes quarterly stats on ownership rates dating back to 1965. As you can see in the chart below, the rate remained remarkably stable between 1965, when it registered at 62.9%, and 1994, when it was 63.8%. For the purposes of this discussion, I have highlighted three presidential terms: two under President Clinton and President George W. Bush’s first term.
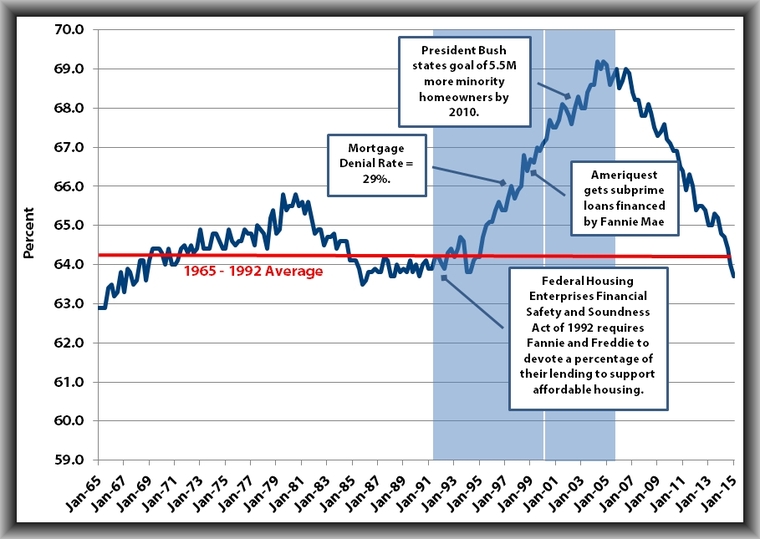
The “boom times” for housing essentially started after the election of President Clinton, who went to remarkable lengths to encourage homeownership. Readers may remember the 1994 National Homeownership Strategy when the President directed HUD to come up with a viable plan to increase homeownership. And it worked; during the Clinton administration, homeownership rose from 64.2% to 67.1%.
During his first term, President Bush continued the practice of encouraging homeownership, as it dovetailed with his Ownership Society goals. His, and President Clinton’s efforts, led to the highest home ownership rates on record, peaking at just over 69% (about 5% higher than record-keeping averages). But as we all know now, it also led to the burst of the biggest housing bubble in our nation’s history. Yes, ownership rates skyrocketed, but the market was artificially inflated and unsustainable. Home ownership rates have since dropped to 63.7%, but this is only marginally below the long-term average of 64.3. Hardly calamitous as some are suggesting.
That said, I do think that that the rate could fall a little further. Now, before you start blaming the Millennial generation, stop, because they are not the ones leading this charge. (As a side note, I do feel rather sorry for this group, as they appear to be taking the brunt of any and all economic woes at the moment.) If we look at homeownership rates by age, between 1994 and today, the decline in homeowners under the age of 35 is 2.5%. A palpable drop, but slight when compared to 35-44 year olds who have seen their numbers drop by 6% – from 64.4% to 58.4%. Why? Because this group took the largest hit following the housing crash, and many lost their homes to foreclosure.
Circling back to Millennials, it’s true that this group is more subdued relative to homeownership – and there’s good reason for it. Millennials comprise a smaller share of married couples and a higher share of in-city dwellers versus suburbs. But their lack of growth may well be offset by middle-aged families who are thinking about getting back into homeownership again. According to RealtyTrac, while Millennials have gotten a lot of attention lately as the generation whose below-normal homeownership rates are changing the landscape of the U.S. real estate market, the boomerang buyers — who are primarily Generation Xers or Baby Boomers — represent a massive wave of potential pent-up demand that could shape the housing market in the short term even more dramatically.
Data from Transunion supports this theory, suggesting that there are about 700,000 consumers who will become eligible to re-enter the housing market in 2015, and up to an additional 2.2 million potential buyers will requalify over the next five years. It’s likely that these so called “boomerang buyers” will become homeowners again, which will do its part to offset the Millennial drop, and raise the homeownership rate back up to its historic averages.
So, have homeownership rates declined? Yes, but as the data and this analysis show, taking a simple “peak-to-trough” view of homeownership figures does not necessarily provide accurate results. Regardless of how many scaremongers declare otherwise.
Visit the Windermere blog for the original article.
